Generate a CSR code in Ubuntu with Apache2
Creating Your CSR with OpenSSL
Use the instructions in this section to create your own shell commands to generate your Ubuntu with Apache2 CSR with OpenSSL.
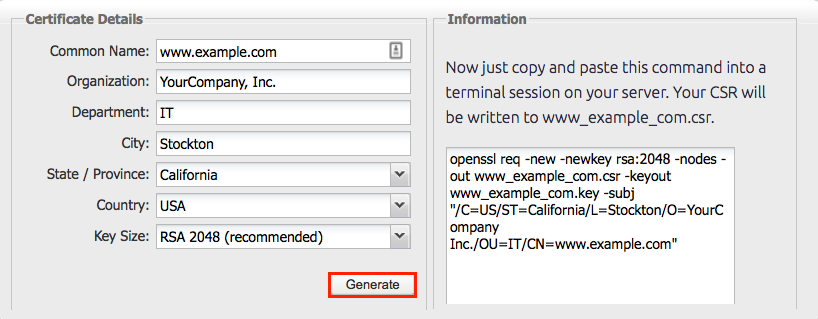
You can save time by using the DigiCert OpenSSL CSR Wizard to generate an OpenSSL command to create your Ubuntu with Apache2 CSR. Just fill out the form, click Generate, and then paste your customized OpenSSL command into your terminal.

How to Generate a CSR for Ubuntu with Apache 2 Using OpenSSL
If you prefer to build your own shell commands to generate your Ubuntu with Apache2 CSR, follow the instructions below.
-
Log in to your server via your terminal client (ssh).
-
Run Command
At the prompt, type the following command:
Note: Make sure to replace server with the name of your server.
openssl req –new –newkey rsa:2048 –nodes –keyout server.key –out server.csr- Generate Files
- You've now started the process for generating the following two files:
- Private-Key File: Used to generate the CSR and later to secure and verify connections using the certificate.
- Certificate Signing Request (CSR) file: Used to order your SSL certificate and later to encrypt messages that only its corresponding private key can decrypt.
- When prompted for the Common Name (domain name), type the fully qualified domain (FQDN) for the site that you are going to secure.
- Note: You may have already set up default information.
- Now, your OpenSSL .csr file is created.
- Order Your SSL/TLS Certificate
- Open the .csr file you created with a text editor.
- Copy the text, including the -----BEGIN NEW CERTIFICATE REQUEST----- and -----END NEW CERTIFICATE REQUEST----- tags, and paste it in to the order form.
- Save Private Key. Save (back up) the generated .key file. You need it later to install your SSL certificate.
- Install Certificate. After you've received your SSL certificate, you can install it on your server.
Updated 15 days ago
